Fancy making your own sweet or savoury pastry? Don’t know what to to with all that stockpiled flour? If you need an easy pastry recipe, here are 6 to choose from
Did you spend lockdown honing in on your cooking or baking skills? Well, what about your pastry making skills?
If you stockpiled a load of flour and are sick of baking banana bread and carrot cake, why not try a few pastry recipes instead from Julie Jones’ new book The Pastry School, which strikes the perfect balance between sweet and savoury.
Packed with leafy greens, yummy pears, immune boosting mushrooms, devine dark chocolate and flavoursome nuts, these recipes have come in handy to cater to our ever demanding taste buds.
It’s also perfect for the kids too, so why not let them have some fun whacking a rolling pin around and creating the perfect pastry (aka a delicious mess).
Time to conquer your patisserie dreams? We’re so ready.
Pastry recipe #1 Salted & Sweet Gluten-Free Pastry
I won’t sugar-coat this, getting this pastry right was a challenge. After all, pastry relies on gluten for its stretch, which in turn enables us to shape pastries easily and give each variety its unique texture. Without gluten, pliability is lost and the texture when eating becomes unpleasant, even powder-like.
However, with so many people now suffering from gluten intolerance, and some just preferring not to eat gluten, I felt that a decent alternative pastry was a much-needed addition to this book.
After endless amounts of researching and testing, I do believe this coeliac-friendly recipe is great, both in taste and texture – which, if you have tasted gluten-free pastry before, you will know that this is quite a revelation.
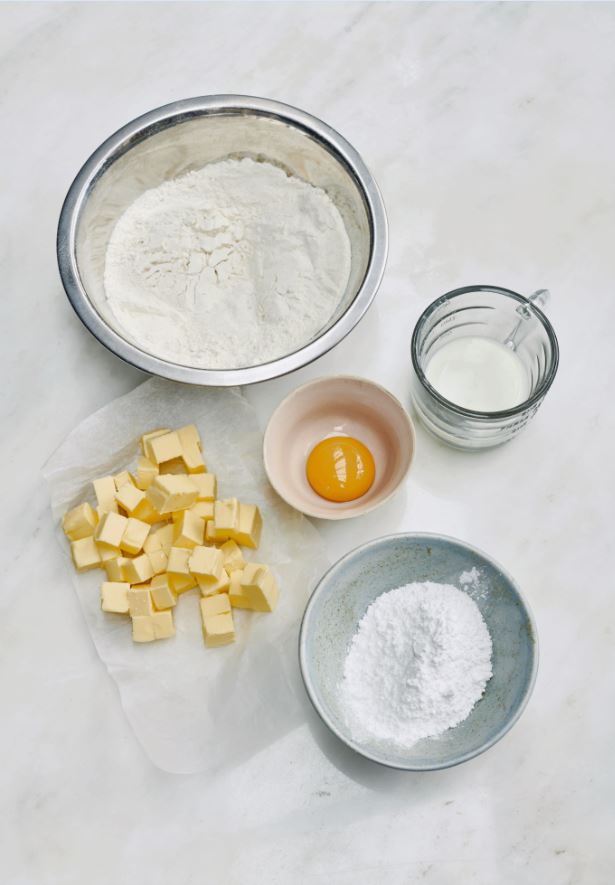
Ingredients (Makes 1 Quantity):
–35g (1 1/4oz) ground almonds (for a stronger flavour, use ground hazelnuts)
–40g (1 1/2oz) brown rice flour, plus 1 tablespoon, if needed
–50g (1 3/4oz) juwar (sorghum) flour
–35g (1 1/4oz) tapioca flour
–30g (1oz/scant 1/4 cup) cornflour (cornstarch), plus extra for dusting
–15g (1/2oz) amaranth seeds, ground (*see note)
–1/2 teaspoon fine salt
–115g (4oz/1/2 cup) unsalted butter, very cold, cut into 1cm (1/2 in) cubes
–1 egg yolk
–50ml (1 2/3fl oz/3 1/2 tablespoons) cold milk
For egg wash (if stated in the recipe)
–1 egg yolk
–boiling water
* To grind the amaranth seeds, place a larger amount than you need into a spice grinder, pestle and mortar, or similar, and blitz or pummel until the seeds become floury but aren’t yet reduced to a powder – this texture will help the finished pastry have some crunch. Weigh out the 15g (1/2 oz) needed and keep the rest in an airtight container for future use.
* For a sweet version, simply add 20g (3/4 oz) icing (powdered) sugar and omit the salt.
Method:
- In the bowl of a freestanding mixer, place all of the dry ingredients (1) and the butter, then attach the paddle. Mix on a medium speed until the butter has been incorporated into the flour
- (2) – bigger, unevenly distributed pieces of butter are fine, as this will help the pastry to flake and be less cardboard like when baked (as is characteristic of gluten-free pastry).
- Add the egg yolk and the milk (3) and continue to mix until a cohesive dough forms (4) – this should take only 30–60 seconds, depending on your mixer. If the pastry seems overly wet at this point, add an extra tablespoon of brown rice flour and re-mix.
- Lay out a long sheet of cling film and place the pastry on one half, then flatten it down with the palms of your hands and fold the remaining cling film over the top, fully encasing the dough.
- Roll out between the cling film (5) to an approximate depth of 5mm (1/4 in), trying your best to keep it in a circular shape. Place in the fridge for at least an hour to rest.
- After resting, lay out a sheet of non-stick baking paper and dust it with cornflour (corn starch). Transfer the pastry to the paper and dust the surface with a little more cornflour.
- Top with a second sheet of baking paper and roll out between the papers (6), lifting and replacing the papers from time to time to prevent sticking.
- An additional light dusting of cornflour will do little harm. The pastry is now ready to use according to the relevant recipe instructions – whether to line tart tins or simply cut and baked to make the base of a tarte fine.
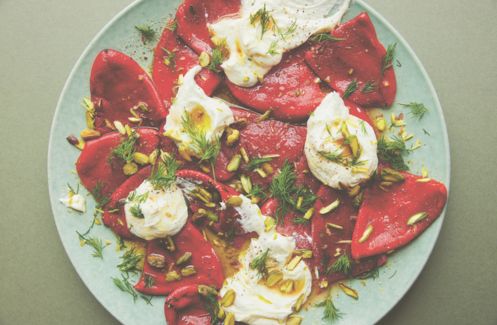
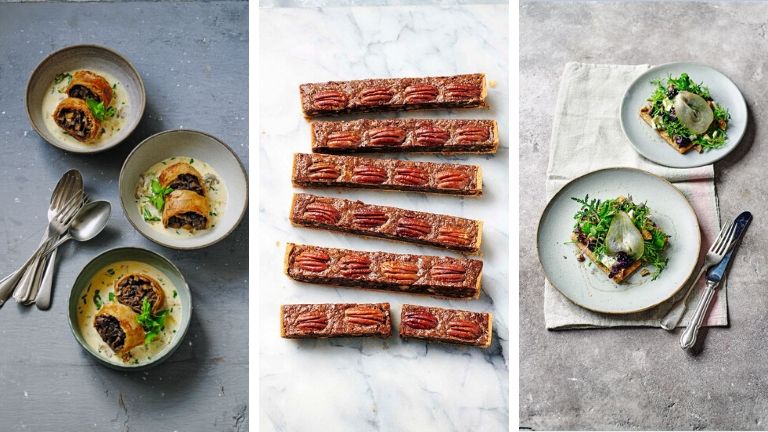
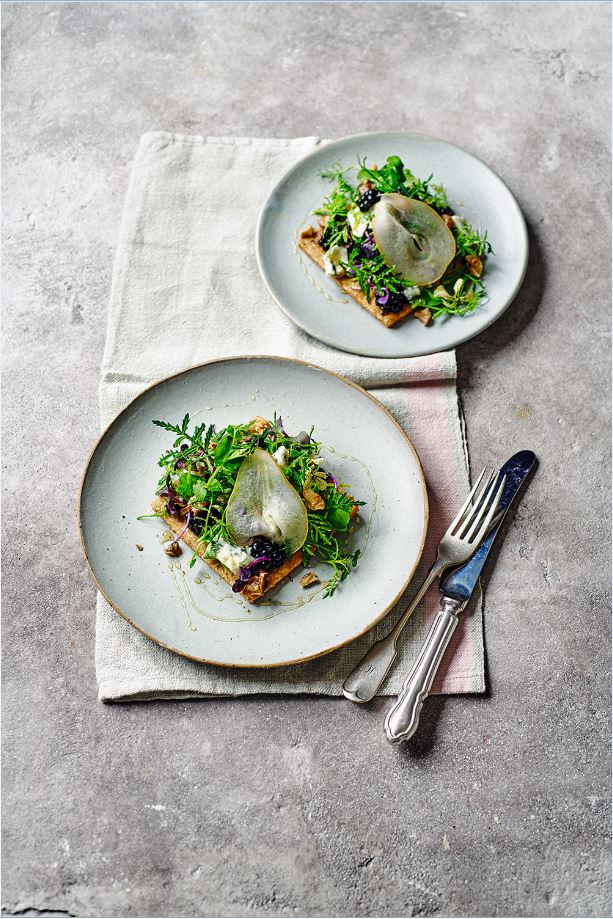
Pastry recipe #2 Walnut, Pear and Regalis Tarte Fines
The combination of soft fruit, tangy cheese and toasted nuts is undeniably heaven, and the nuts and seeds within the gluten-free pastry make the perfect platform on which to serve this, making a very tasty and sophisticated lunch, starter or light supper.
Admittedly, Regalis cheese isn’t easy to find, but if you can source some, I promise it will be worth it – sweet yet sharp, salty and slightly floral, it is truly unforgettable.
If you are ever in London, make sure to pop into a branch of La Fromagerie to grab some. If you can’t find Regalis, Roquefort would work well.
MAKES 6 TARTS
Ingredients:
–1 quantity Salted Gluten-free pastry (see recipe above)
–Cornflour (cornstarch), for dusting
For the pear:
–100ml (3¹⁄³fl oz/¹⁄³ cup plus 1 tablespoon) pear cordial, diluted with 100ml water, or
200ml (7fl oz) water
–50g (1¾oz/¼ cup) caster (superfine) sugar
–Juice of 1 lemon
–1 firm pear, washed
For the topping:
–150g (5½oz) Regalis, crumbled into small pieces
–80g (2¾oz) walnuts, toasted and crushed
–1 punnet blackberries, halved interesting salad leaves, such as tagete, pea shoots and purple radish
To finish
–extra virgin olive oil, for drizzling
–runny honey, for drizzling
–Maldon salt and black pepper
–Rocket flowers, if in season (optional)
ALTERNATIVE & CREATIVE PASTRY
HW | IP | S
CH |P | SH | VIE
Method:
- Make the pastry following the recipe above. Roll between two sheets of non-stick baking paper to around 5mm (1/4in) thick; if it’s sticking, dust with cornflour (cornstarch).
- Leave to rest in the fridge for at least 30 minutes. Preheat the oven to 180ºC (350ºF),
Gas Mark 4. - Line a baking sheet with non-stick baking paper. Cut the pastry into six squares, each measuring approximately 10 x 10cm (4 x 4in). Place on the lined baking sheet.
- Prick the surface of each square with a fork, then score a border 1cm (½in) on each. There’s no need to egg wash the pastry, simply bake in the oven for 15–20 minutes, until golden and crisp. Remove from the oven and allow to cool on a wire rack.
- As the pear will brown quickly, gather all of the other ingredients first and have them ready for assembling. Mix together the cordial, water, sugar and lemon juice in a pan, then gently heat
until just starting to simmer. - Finely slice the pear vertically, either by hand or use a mandolin, then submerge the slices in the simmering liquid for 2–3 minutes, until pliable but not breaking. Drain and set to one side.
- Divide all of the topping ingredients evenly among the baked pastry squares, and fold and nestle a pear slice between the leaves. Drizzle with olive oil and honey then finish with a flourish of salt and pepper and some rocket flowers, if you like. Serve immediately.
Pastry recipe #3 Sweet Shortcrust Pastry
This classic pastry is my go-to recipe for most of the sweet pies and tarts in this book. No alterations are needed from one recipe to the next, other than the quantity needed.
That said, if you are feeling experimental, additional flavourings such as citrus zest, vanilla, ground nuts and spices can be added successfully, although do use them sparingly.
To overpower the perfect buttery taste that this pastry offers would be a great shame. Personally, I prefer to focus the layering of flavour into the pie or tart filling instead.
One quantity of pastry is enough to line a large circular tin measuring 23 x 3.5cm (9 x 1 1/2in), with extra remaining for small decorations. For a fully covered decorative pie, a double quantity will be needed.
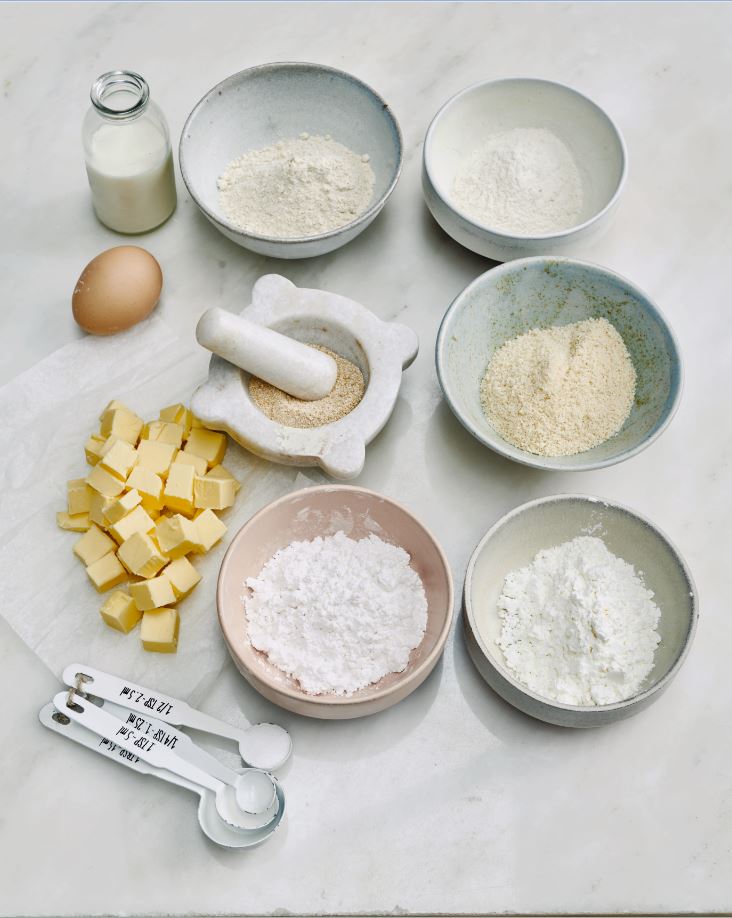
Ingredients (Makes 1 quantity):
–230g (8oz/1¾ cups) plain (all-purpose) flour
–125g (4½oz/½ cup plus 1 tablespoon) cold unsalted butter, cut into 1cm (½in) cubes, no need to be precise
–50g (1¾oz/heaping ¹⁄³ cup ) icing (powdered) sugar
–1 egg yolk
–2 tablespoons milk
For egg wash – if and when the recipe calls for it
–1 egg yolk
–boiling water

Method:
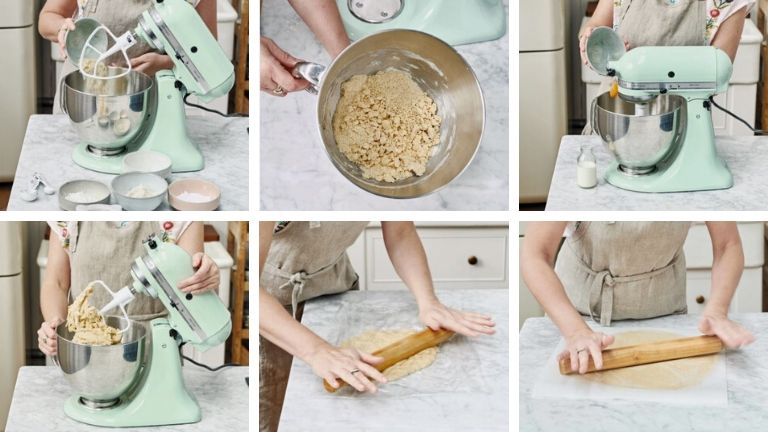
- Place the flour and butter into the bowl of a freestanding mixer and attach the paddle beater. Mix on a medium speed until the butter has been incorporated into the flour and resembles fine breadcrumbs (1).
- Add the icing (powdered) sugar and mix for a few seconds before adding the egg yolk and milk (2) Continue to mix until a cohesive dough forms (3) – this should only take 30–60 seconds, depending on your mixer.
- Turn out the pastry onto a work surface – there’s no need for more flour – and bring it swiftly together with your hands, without overworking it (4).
- Lay out a long sheet of cling film and place the dough on one half. Flatten the pastry with the palms of your hands, then fold the remaining cling film over the top, fully encasing the dough. Roll out swiftly between the cling film (5) to an approximate depth of 5mm (¼in), trying your best to keep it in a circular shape. Place in the fridge for at least an hour before using.
- After resting, roll out between two sheets of non-stick baking paper (6) – there’s no need for more flour – and use according to the relevant recipe instructions.
Pastry recipe #4 Chocolate, Pecan and Brazil Nut Bars
Pecan pie isn’t something that is regularly seen or baked here in Cumbria, I had never even tasted it until in my late 30s.
Crazy, I know, given that pecans are one of my favourite nuts, those and Brazil nuts – hence the latter’s rather unconventional appearance within these bars, though other nuts such as peanuts, cashews or macadamia would work well, too.
Of course, this recipe can be set into a round tart tin and served as a more conventional pie, but I rather like the portion given when sliced into bars.
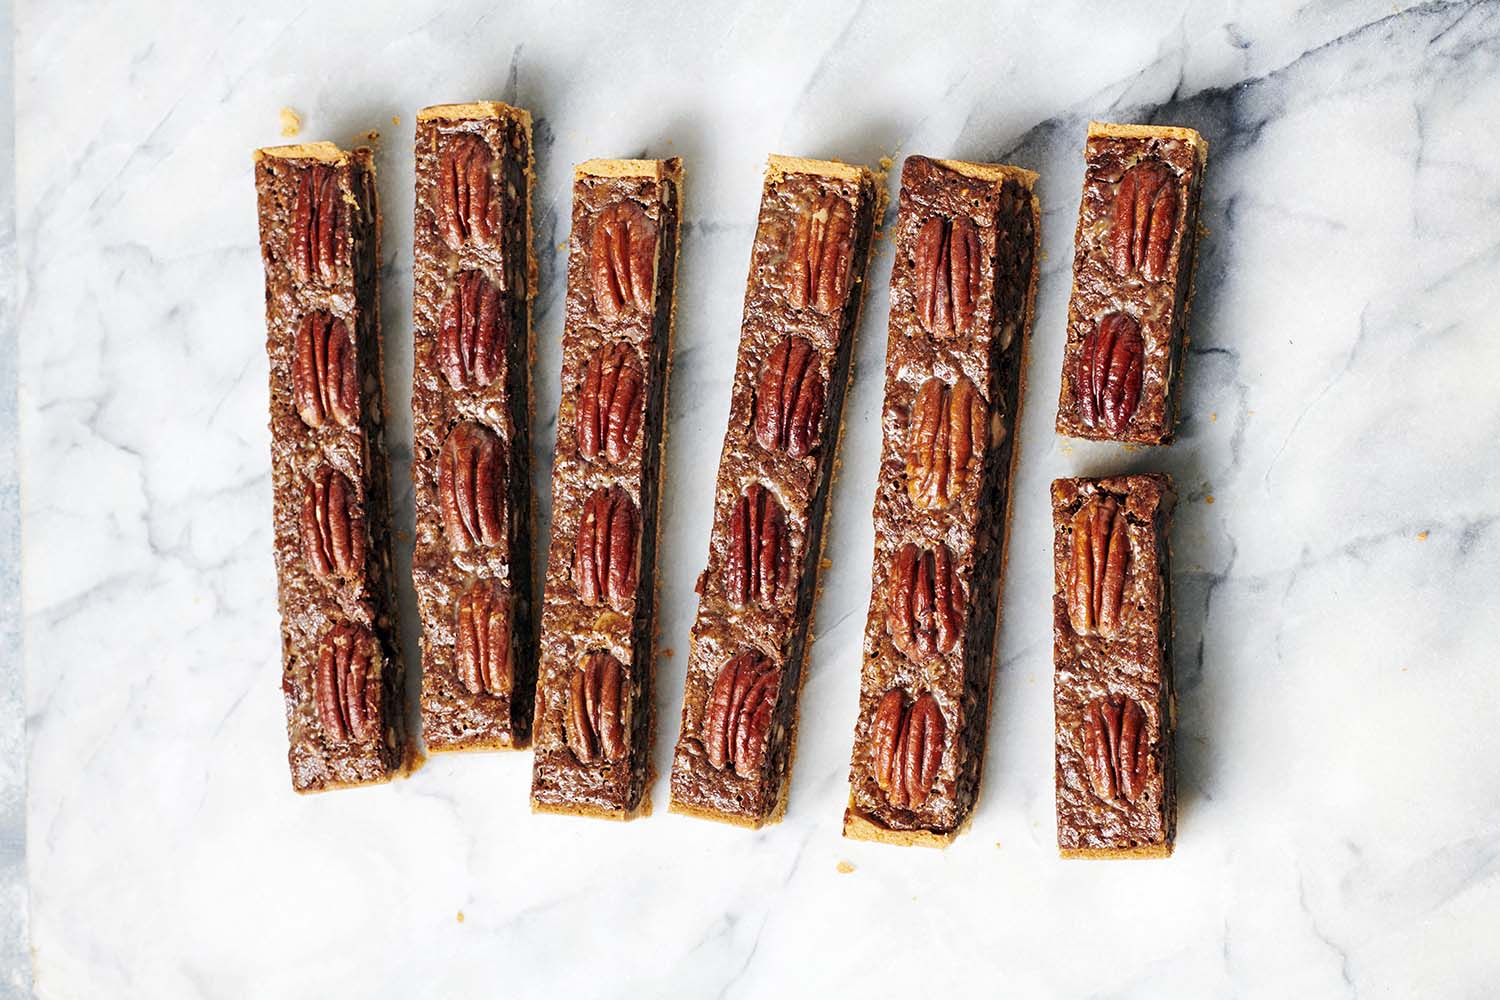
Serves 12 / Equipment: A loose-bottomed 18 x 2.5cm (7 x 1in) square tin
Ingredients:
– 1/2 quantity Sweet Shortcrust pastry (see recipe above)
– 25g (3/4oz/ 1 1/2 tablespoons) salted butter
– 50g (1 3/4oz) golden syrup
– 40g (1 1/2oz) maple syrup
– 50g (1 3/4oz) dark chocolate, broken into chunks
– 50g (1 3/4oz/ 1/4cup) soft light brown sugar
– 60g (2oz) Brazil nuts, toasted and chopped
– 100g (3 1/2oz) whole pecan nuts, toasted – 24 left whole, the remainder chopped
– 2 eggs
– 1 tablespoon plain (all-purpose) flour
– 1 teaspoon vanilla bean paste (optional)
Method:
- Preheat the oven to 150°C (300°F), Gas Mark 2.
- Meanwhile make the filling. Set a heatproof bowl on top of a pan of simmering water, making sure that the base of the bowl isn’t touching the water, and add the butter, syrups, chocolate and sugar to it.
- Let the rising heat slowly melt everything together, stirring every so often
- Remove from the heat then stir through the vanilla and flour, then add the eggs- one at a time, giving a good stir in between each addition
- Tip in the chopped nuts, give one final mix and pour into the pre-baked pastry case. Top decoratively with the whole pecans.
- Bake in the oven for 25 minutes.
- When done, the filling should have a slight wobble towards the centre, which sets fully when cooling.
- If needed, bake for longer, checking again after 5 minutes.
- Allow to cool completely before removing from the tine.
- Slice the very ends from two adjacent sides and slice equally into bars.
- Those could then be halved or quartered for a smaller portion, or if you are hungry, leave them as is!
Pastry recipe #5 Sheet Pastry
Please don’t just flick past this page, making sheet pastry is simpler than you may think, and it is easier to achieve than filo, in the respect that it is stretched rather than rolled to paper-thin transparency.
I’m not saying this pastry is a doddle, but it is something you’ll get better at with practice, and believe me, I say this from experience.
The trick is to stretch the dough little by little, resting between each stretch until eventually an incredible sheet of see-through pastry lies before you. It is very satisfying once you have the knack, and totally worth the effort.
You will need a lint-free cloth laid smoothly over a small table or similar, measuring approximately 100 x 50cm (3ft x 20in). I use my coffee table, which has proven to be the perfect size for one quantity of dough.
Ingredients (Makes 1 quantity):
Suitable for both sweet and savoury bakes
–250g (8 3/4oz/1 3/4cups plus 2 tablespoons) plain (all-purpose) flour, plus extra for dusting
–1 teaspoon fine salt
–1 egg
–100g (3 1/2oz) warm water, around 50°C (122°F)
–1 tablespoon grapeseed oil, plus extra for rubbing
Method:
- Place the flour, salt, egg, water and oil into a bowl and mix together using a fork (1).When the dough is mostly cohesive, turn out onto a lightly floured work surface and knead for 3 minutes (2), stretching and pulling, rolling beneath hands.
- When smooth, shape into a ball and rub all over with a little more oil (3), then wrap in cling film and rest in the fridge for 30 minutes. It is important to start the next process precisely after the 30-minute resting. I have found this to be the optimum time for the dough to be stretched. I don’t know why, no doubt there will be a scientific reason behind it! I recommend setting a timer after placing it in the fridge, so you don’t forget.
- Lightly yet evenly dust the tablecloth with flour and rub in well. Place the ball of dough in the centre of the table, dust with flour and start to roll out, trying to keep the shape rectangular (4). As the dough stretches it is important to rest occasionally for 30-second intervals, to allow the dough to relax – which makes rolling easier. Continue to roll until the surface area has at least doubled, after which time all further stretching must be done by hand.
- Snag-free hands are essential here, so if needed do remove any of your rings and clip sharp nails to prevent tearing. Start the stretching by lifting an edge of the dough and gently and slowly pull the dough outwards (5), until it stretches.
- Move around to another area and do the same, continuing around the table until the pastry has stretched out towards its edges (6). Do be patient, only returning to a previously stretched area after 30 seconds or more. Small holes or tears may appear, but worry not – a perfect stretch only comes with practice and usually these snags won’t be noticed when the pastry is used later.
- Continue to stretch until the dough hangs over the table’s edges, to secure it in place. Allow the pastry to dry for 5 minutes before trimming all around the outer edge using a pizza wheel. Discard the excess.
- Some recipes will call for the pastry to be rubbed with cornflour (cornstarch) (7) or cut into sheets (8). Some will call for a lengthy drying time and others may need to be generously brushed with butter. Whatever the use, stand back and look at what you have created (9) from a few basic ingredients and some patience. Refer to individual recipes for further instructions on use.
Pastry recipe #6 Chestnut and Mushroom Rotolo
Rotolo is a delicious rolled pasta dish that originated in Emilia-Romagna, Italy. When making this one afternoon it suddenly dawned on me that this filling would work equally well if rolled in sheet pastry.
Upon trying it didn’t disappoint, the crispy pastry encasing the soft centre was perfect, the sauce offering an extra hug of comfort. Subsequently I am now hooked on making all things ‘rotolo’, and not just with pasta.
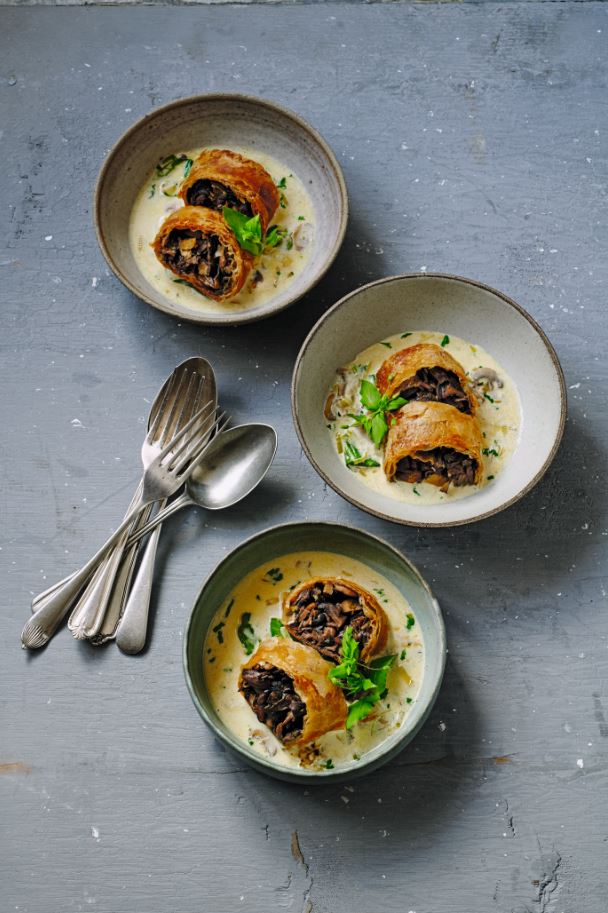
Serves 4-6
Ingredients:
–1 quantity Sheet pastry (see recipe above)
–60g (2 1/4oz/ 1/4 cup) salted butter, melted and browned
–fine salt and black pepper
For the filling
–60g (2oz/ 1/4 cup) salted butter
–olive oil, for frying
–250g (8 3/4oz) each of chestnut, field and white mushrooms, finely sliced
–Maldon salt and black pepper
–10g (1/3oz) dried porcini, rehydrated in
–300ml (10fl oz/1 1/4 cups) boiling water
–1 large garlic clove, very finely chopped
–1 tablespoon chopped thyme leaves
–1 tablespoon finely chopped parsley leaves
–180g (6 1/3oz) vacuum-packed chestnuts, chopped
For the sauce
–40g (1 1/2oz/3 tablespoons) salted butter
–Olive oil, for frying
–100g (3 1/2oz) white mushrooms, finely sliced
–Maldon salt and black pepper
–1 large garlic clove, very finely sliced
–1/4 leek, quartered and finely sliced
–400ml (13 3/4fl oz/1 3/4 cups minus 1 tablespoon) chicken or vegetable stock
–200ml (6 3/4fl oz/3/4 cup plus 2 tablespoons) double (heavy) cream
–Handful of spinach leaves
–1 tablespoon finely chopped fresh parsley
–Fresh nutmeg, for grating
To garnish (optional)
–green leaves, such as chickweed or rocket
ALTERNATIVE & CREATIVE PASTRY
CH | GF | HW | S | VIE
Method:
- As the filling needs to be cold prior to rolling, make this first. Add the butter, along with a splash of olive oil, to a large hot frying pan. Add the sliced fresh mushrooms, season with a good pinch of salt and a grinding of pepper and allow to cook for 20 minutes, stirring every so often.
- After those 20 minutes, the mushrooms will have released most of their moisture and will have started to fry. Drain the rehydrated porcini through a sieve lined with wet kitchen paper (to catch the grit), reserving the liquid.
- Rinse the porcini to remove any remaining particles, then finely chop. Add these to the pan along with the garlic, thyme and a little more oil. Continue to cook for a further 5 minutes, stirring now and then. Add the porcini liquid, simmering to evaporate. Stir through the chopped chestnuts, check the seasoning and adjust if necessary. Transfer everything from the pan to a bowl and allow to cool completely.
- Make and stretch the sheet pastry over a table or work surface covered with a cloth, as instructed on page 30. When fully stretched, trim to a rectangle measuring approximately 50 x 100cm (20in x 3ft), then brush the whole surface with the browned butter and sprinkle over some fine salt and black pepper. Allow the pastry to dry slightly on the cloth for about an hour.
- Preheat the oven to 180ºC (350ºF), Gas Mark 4. Lay the filling along a shorter edge of the pastry, tucking in the outer sides, thus securing the filling in place for rolling. Roll up, using the cloth underneath to help. Roll fairly tightly until you reach the opposite end of the pastry, use some of the melted butter as glue. Transfer to a baking sheet lined with non-stick baking paper and position so that the pastry’s seam is underneath. Brush with any remaining butter and bake in the oven for 40–45 minutes until crisp and golden.
- While the rotolo bakes, make the sauce. Heat a large frying pan, add the butter and a splash of oil. Add the mushrooms, season and fry until turning brown. Add both the garlic and leek and sauté until soft, then add the stock, simmering until the liquid has reduced by half.
- Pour in the cream, bring back to a simmer and gently bubble for 5 or so minutes until thickened. Add the spinach and parsley, a grating of nutmeg and check the seasoning. When the rotolo has baked, slice into portions and serve in a puddle of sauce, adding a sprig of greenery to garnish, if so desired.
These recipes were extracted from The Pastry School by Julie Jones published by Kyle Books.
Relevant Healthista Content:
5 easy vegan recipes with 5 ingredients from your supermarket
4 oily fish recipes that will make you want to eat it
Healthista Content you may also like:
30 day fat-burning home workout challenge – Day 29
5 best meal replacement shakes
How to stay active during self isolation – 19 home workouts to keep you moving
9 natural insomnia remedies to help you sleep better tonight
Like this article? Sign up to our newsletter to get more articles like this delivered straight to your inbox.